

Hello everyone!! I first found this adorable idea on a blog by Paula Goff and decided to try it out. How easy and cute are these??? To put the basic elements of the project together took me no more than 30 minutes. Now trying to decide how to decorate it was another matter entirely!
So you can try these adorable bags for yourself, here is my first tutorial for all of my fellow stampers. Just to be clear, this is not my original idea, not sure who's it is, as I've seen them popping up all over lately.
At the end of this tutorial you will see what the blog candy is all about!!

Supplies you will need:
Designer/Patterned paper – cut to 5 ½” x 11”
Coordinating cardstock – cut to 4 ½” x 4 ½” and 1 ½” x 11”
Slit punch
Paper snips
Scoring blade/Scor-Pal ®
Sticky Strip
Adhesive
Bone Folder
Round Tab punch – 2 needed for handles
stamps/ribbon and other accessories to finish your bag
Designer/Patterned paper – cut to 5 ½” x 11”
Coordinating cardstock – cut to 4 ½” x 4 ½” and 1 ½” x 11”
Slit punch
Paper snips
Scoring blade/Scor-Pal ®
Sticky Strip
Adhesive
Bone Folder
Round Tab punch – 2 needed for handles
stamps/ribbon and other accessories to finish your bag
Step 1
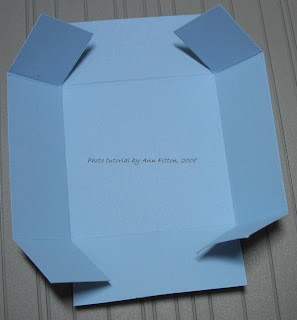
Using a scoring blade or a Scor-Pal ®, score the 4 ½” x 4 ½” piece at 1” and 3 ¼”. Turn cardstock 90’ and score again at same positions. Fold and crease your box using bone folder. This is the base of your project.


Step 2
Using your paper snips, cut up to the 1” mark on 2 of the four sides
Step 3
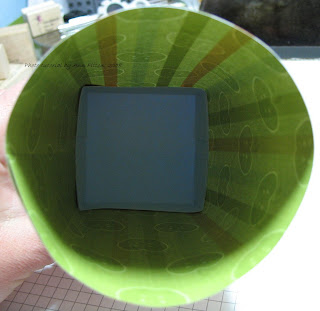
On the 4 outside squares, apply 2 strips of sticky strip.
You can now begin assembling your box. Fold the squares with the sticky strip into the box.
You can now begin assembling your box. Fold the squares with the sticky strip into the box.

Step 4
On the side of the designer paper you want facing INSIDE your box, lay a strip of sticky strip on one long side and one short side. TIP: If you are using striped paper, as I am, be careful when you cut it so you have your stripes going in the direction you want them to. Remove the red backing from the long side only. I also ran a strip of my SNAIL ® along the top edge of the sticky strip just for added strength.

We are now going to adhere the box to the designer paper to begin forming the bag. Start in the middle of one of the sides where the squares are folded into. TIP: Be careful of lying the box down and lining up the paper and the box. Sticky Strip is very unforgiving!!

Now start “rolling” your box along the bottom edge of the paper.


Before you get to the very end, pull off the backing from the strip on the short side of the paper.
Step 5
Using the strip of cardstock, and your slit punch, punch out a scalloped edge. If you have the new SU! scallop border punch, or any border punch, this works great too!


Step 6
Once your scallop edge is punched out, lay a strip of sticky strip along the entire length. You are now ready to adhere the scallop to the bottom of your bag. This will be done pretty similar to way you wrapped the designer paper around the box. Start at the back of your bag, either at, or just over, the seam. Remember: Sticky Strip is very unforgiving if it sticks where you don’t want it!!


Step 7
Place two strips of sticky strip on the Round Tab punched pieces. DO NOT remove backing yet!!

I used my Crop-A-Dile to make holes, but a handheld punch works too.

You can leave the holes as is, or as I did, add eyelets for added strength. Tip: If you use eyelets, put the handles on the bag first and then set your eyelets. Makes it just a little easier. Put the handles in the middle of each of the “wider” sides.

This is what the finished Box in a Bag will look like, without any embellishments or ribbons or whatever you decide to use to decorate your bag with.

Here is the finished bag from the tutorial:

The apple bag I left the holes on the handles bare and on the Koala bag I added white eyelets. If you want to add two ribbons as I did here, use bigger eyelets or none. This was a tight fit! The scallop on the apple bag uses a Martha Stewart punch. The finished dimensions of the bag are 5 ½” H x 2 ½” W at the base. All images © Treehouse Stamps, 2008.
These bags are quick and easy to make for small thank you, birthday, thinking of you or hostess gift. They can be filled with chocolates, pens, gift cards, or small stamps and ink spots. Whoever you give one of these to will love it!!
If you decide to give this a try, link your bag back here to be entered into my Bag in a Box blog candy giveaway!!! I'm not exactly sure what I'll be giving, but there will be 2 winners, and each person will receive one of the bags I've already made filled with lots of stamping related goodies!!!
You will have until Saturday, July 12, 2008 by 12 midnight to link your bag back to me. I will choose a winner using a random number site on Sunday, July 13, 2008 and post the winners by 6pm. So get creating!! I can't wait to see what everyone comes with!
Happy Stamping!!
~~~Ann~~~
5 comments:
Ann,
What a great tutorial. I will be sending my projects to you later tonight - I created two in such quick time while working today. I like one better than the other but the girls at work thought they were both cute.
Brandy
really great tutorial! I don't know when I'll find time to make one, but someday I will!
Hey Ann,
Here is my box in a bag
www.starstampers.blogspot.com
thanks Brandy
I would love to enter your giveaway, but unfortunately I dont have a box in a bag to link back here with. I do however want to tell you that your tutorial was great and very easy to understand especially with the pictured illistrations. Thank you, I will keep this post in my favorites file for a long time to come...especially when I could actually purchase the goodies to make one with (gas prices are too high right now).
This bag is so cute! TFS the tutorial! FYI I found your blog from the SCS "day in the life of a dirty girl" forum. Hopefully I'll get to play in one of your future blog challenges! :-)
Susan (PSU_Mom)
Post a Comment