Hello everyone!! Just wanted to let you know that I made it to Salt Lake City safe and sound and am looking excitedly to the start of convention tomorrow!!!!! I've already been to the Salt Palace and checked things out and I am so, so, so, so excited. I saw a sneak peek of some new punches coming out and you'll want them for sure!!!!
I'll post more later this week if I can!!
Happy stamping!!!! And don't forget the Creative challenge this week, Embellishment Encore!!!
~~~Ann~~~

Tuesday, July 29, 2008
Sunday, July 27, 2008
GCA2 - Embellishment Encore!!!

Hello everyone!!! Today is Sunday and that means another Getting Creative with Ann challenge!!! This week the focus is on all those UNOPENED, had to have them, love em and you haven't used them since you bought/received them, embellishments!! And I'm not talking about the embellies you just bought yesterday! I want you to scrounge your stamp space and find those poor neglected embellishments and put them to good use!
The embellishments you choose could be some you have purchased or you may have received as a gift from someone!
My sample for you combines two challenges: the GCA and the Featured Stamper #77 on SCS. You can see Julia's card here, that I choose.
Here are the changes I made:
* Stamp set: Dreams du Jour by SU! - coming soon to the new catalog!!
* Colors: Riding Hood Red, Pink Pirouette, Choc. Chip, WW & Bella Rosa dsp.
* Instead of the slit punch for my scallop, I used the new SU! scallop edge punch. I then used my white Signo gel pen to put dots on each scallop.
* Used a choc. chip stitched (non SU!) ribbon.
* Instead of buttons, I used 1/2" circle tile spots with punch outs from the stamp for my embellishment.
* Left off the sentiment strip.
* Used 2 scallop circles under the main image for bordering. Main image is up on dimensionals and then the entire panel is up on dimensionals.
The two embellishments I used, which until today were unopened, are the ribbon and the tile spots. The ribbon I received from a secret sister exchange quite awhile ago and the tile spots I bought months ago, because I had to have them, and not used since then!!! I included a pic of my embellies for you to see.

So take a minute and look around your stamp room and see what you can use that has, until today, been unopened and unused!! You know you have something, now is the time to get it out and put it on a fabulous creation!!!
To be entered in the challenge drawing, make a card with your unused embellishments, upload it either to your blog, or to an online gallery and post a link to your card to this blog entry as a comment by August 2, 2008 at 12 midnight. I will choose the winner through a random number generator and post the next day. Even if you can't make the drawing deadline, PLEASE feel free to participate in the challenge and upload your creations at any time. I would love to see it!
If you upload your card on SCS, please put GCA2 (NO SPACE IN BETWEEN GCA AND 1) in the keyword section. That way everyone can look at all of the creations at once!
Please remember I am leaving for SU!'s convention Tuesday morning and will return home late Sunday night. I will check in as often as I can during the week, when I find a computer!!! I will most likely post next week's challenge on Monday, August 4th. So I've given you extra time to work on this challenge!!
Happy Stamping!!!
~~~Ann~~~
Saturday, July 26, 2008
GCA1 Winners!!!!
Yes, the title says winners, as in more than one!!!
I noticed all the increased foot traffic to my blog (THANK YOU!), but only two cards made it in by the drawing deadline. Since I created two samples, I will be sending one to each of this week's winner's!
Who are they you ask?? That would be Brandy and Cathy!!! These two lucky ladies are receiving goodies from me two weeks in a row!! C'mon ladies, I know you can give them a run for their money!!!
Here are the cards they created with the sketch. Just fabulous ladies and thank you so much for playing!!


Created by Brandy Created by Cathy
Thank you again to everyone who has stopped by to check out my Getting Creative with Ann challenge. The next challenge will be posted Sunday afternoon!!! What will it be I wonder?? Check back to find out!!!
Happy Stamping!!!
~~~Ann~~~
Wednesday, July 23, 2008
Rockin Oliver Owl BWC16

Hello everyone!!
It's Wednesday and you know that mean Ashley's BWC is here!! I combined the color challenge on SCS (River Rock, Soft Sky and Very Vanilla) with the BWC sketch and this is what I came up with!
The stamp is a soon-to-be released stamp from Treehouse Stamps, called Oliver Owl. He will be sold as an individual and the sentiment is also available as an individual. Both of these, and more, will be released on August 7th!! I will be showing you more sneak peeks in the coming days.
I decided to try something different on this card, and I must say I really like how it came out. This is my first attempt at the "Out-of-the-Box" technique. I was never quite sure how to do this and honestly, I almost cut off Oliver's head last night while trying to do this!! I may just offer this technique up in one of my Getting Creative with Ann challenges!!! Be on the lookout!!
I ran the Soft Sky background panel through my Distressed Stripes CB folder and then used my distressor tool on the edges. I also distressed the edges of the smaller sky panel under Oliver.
To create Oliver I stamped him in Choc. Chip craft and embossed in clear. Some of the parts didn't embossed very good, but you get the idea. I used my simple SU! markers for coloring all but his belly. His belly was colored with the Soft Sky ink pad and blender pen. I then stamped him again, cut out and colored his wings, and put them on with dimensionals. The entire panel of Oliver is on with dimensionals, and then thicker foam squares were used on the entire panel of Oliver.
I used choc. chip polytwill and wide gg to breakup the colors some, and then added a touch of Very Vanilla taffeta.
Hope you like it!! I really like this sketch and have a swap card ready to go for convention with this sketch. And yes I know that convention is next week!!!
Happy Stamping and be sure to check out the first Getting Creative with Ann challenge just below!!!
~~~Ann~~~
Sunday, July 20, 2008
GCA1 to be posted soon!!
I'm working on the first Getting Creative with Ann challenge right now!! Will be posted soon.
Getting Creative with Ann challenge #1


Hello everyone!!! Here we are at the first Getting Creative with Ann challenge. I am so excited to be doing this I can't stand it!!! I hope you have as much fun participating in these challenges as I have in bringing them to you and showing you my samples.
As you can tell I am posting this much later than I anticipated. My son used my camera today, and now the batteries need charging!!! I apologize for the "photo" of the sketch, but I need to figure out how to make my sketches in a format which I am able to upload. I will post my sample as soon as I charge my batteries. Well the batteries are now fully charged and here are two samples I made for this weeks GCA.
For the first challenge we are starting with a simple, clean lined sketch. I came up with this sketch months ago and have used it for various cards, and felt this was the right choice for the first GCA. Feel free to use any kind of shape for the sentiment panel. I have made cards with this sketch using oval, circle and the key tab punches.
To be entered in the challenge drawing, make a card with this sketch, upload it either to your blog, or to an online gallery and post a link to your card to this blog entry as a comment by July 25, 2008 at 5pm. I will choose the winner through a random number generator and post that evening. Even if you can't make the drawing deadline, PLEASE feel free to participate in the challenge and upload your creations at any time. I would love to see it!
If you upload your card on SCS, please put GCA1 (NO SPACE IN BETWEEN GCA AND 1) in the keyword section. That way everyone can look at all of the creations at once!
Happy Stamping!!!
~~~Ann~~~
Saturday, July 19, 2008
It's about to begin!!!
Hello everyone! The Getting Creative with Ann challenge will begin this weekend!!!! Thank you to all of you who voted in my poll, with the result finishing at either day! Actually this works out the best for me, and I hope it does for you too!!
What exactly does that mean for you? Well, the majority of weekends I will be posting my challenge either late Saturday evening, or Sunday. Since I have a full time job outside the home, Saturdays are usually days where I try to catch up with housework and such. You notice, I said try. Stamping usually interferes with that!!! But on the chance I actually do some housework, I don't want to be stressed about also getting my challenge posted. Once I get into a groove, I know I'll find the perfect time to post.
With all that being said, I'm working on my sample for the first challenge right now!! I couldn't decide what I wanted to do first and so it took me a while to get my sample started. So check back later today, or tomorrow to see the first challenge posted.
Happy Stamping!!!!
~~~Ann~~~
Wednesday, July 16, 2008
It's Wednesday & time for BWC#15

Hello everyone!!
Well, it's Wednesday again and you know what that means!! Ashley's BWC!!! This week Ashley challenged us with another great color combo: Bravo Burgundy, Old Olive, Choc. Chip and Whisper White.
I kept my card pretty simple as I am trying to finish up my swaps to go to convention with!!! Yeah, I leave in less than two weeks now!!
I used the Quiet Moments set here, and if you love this set it is now in limited quantities so hurry over to Treehouse Stamps and put your order in!!! I just love this sentiment as it is so true. How else can you dream if you're surrounded by loud noises and interruptions from all over?? Now I personally don't like to fish, but I could be the girl just sitting on edge of the stream, dangling my feet in the water and dreaming.
My base card is made with Old Olive in a 5" x 5" square size and layered with Bravo Burgundy followed with the white main image panel. I incorporated TLC177 from SCS this week on the main image panel. The technique was to create a grid on your cardstock by scoring. I used my Scor-Pal for the scoring in a diagonal fashion.
To create my image, I first stamped the girl in brown staz on and then I watercolored the grass, water and sunshine with my aquapainter and reinkers to give them a softer look. To color in the girl I used my SU! markers since I wanted her to stand out from the rest. And then I took my SU! markers in darker colors to create highlights in the water and grass.
I used my Martha Stewart border punch for the choc. chip piece and highlighted that with my Signo white gel pen, ala Faith dots!! The same for the top edge of the Bravo Burgundy piece.
The butterflies are a Martha punch and punched with coordinating colors in dsp and Cuttlebugged stock. The sentiment is up on dimensionals.
Enjoy and Happy Stamping!!!
~~~Ann~~~
Tuesday, July 15, 2008
Blog Candy winners!!!
Hello everyone!!!!
I have awesome news to share with all of stamping friends!! Brandy and Stamp Fanatic are the winners of the blog candy!! Each of them created just darling bags and they were the only two who sent me a photo. You can click on each of their names to see the bags they created.
I know may of you visited, as I saw my site meter keep climbing, but during the summer I know it's hard to find time to do stuff! I hope if you visited at some point you will find time to make one of these adorable bags for a someone!!
So, Brandy and Stamp Fanatic, send me your snail mail address to: pinkstamper06@yahoo.com and I'll get these bags out to you in a jiffy!! And thanks for playing!
Don't forget to check out my poll (on the right) and post just below about the upcoming Getting Creative with Ann challenge which starts this weekend!!
Happy Stamping!!
~~~Ann~~~
Sunday, July 13, 2008
Coming Soon!!! Getting Creative with Ann challenge
Hello everyone!! Just like many of of my fellow stampers, I sometimes lose my mojo and need assistance getting creative. As I think about ways to re-energize my creative thoughts, I decided to throw my rubber stamp in the arena and offer up a weekly creative challenge. I know many stampers in blogland are offering the same type of challenges, but I want to offer this for my loyal visitors and friends in way for all of all to grow as stampers. Thus, the Getting Creative with Ann challenge has been born!!
What is this creative challenge you ask? Let me explain! My weekly creative challenge will embrace many types of challenges such as:
Sketch challenges - My own sketches, old SCS sketches or sketches from any of the popular crafting magazines, to name a few.
Color challenges - just like the color challenge on SCS, a grouping of colors will be provided for you to create with. You may see old color challenges from SCS or anywhere!
Technique challenges - here you will get to try out a variety of techniques such as; easy & familiar heat embossing, Cuttlebug Smoosh or something I come up with!!
Spotlighted Stamper challenge - we all know the "famous" stampers in our venue such as Beate, MaryJo Albright and Sharon Johnson just to name a few, but what about all the others out there who quietly stamp and share their work with world? This challenge will spotlight those "unknowns" and their creations. This could be a stamper with only an SCS gallery or a stamper who has a blog and an SCS gallery. I have a few ideas for a fun twist with this challenge!!
Minimum Materials - are materials at a minimum? Then this challenge is for you! Here materials you would be allowed to use on your creation would be kept to a minimum! Remember the early days of stamping, or if you're just getting started you don't own everything you would like to!!
Embellishment Encore - with this challenge the focus will be on the embellishments and finding avenues to showcase them on your creations. How many embellishments do you have sitting around, still in the package, you just aren't sure how to use??? I know have my fair share!!
Creative Idea - this challenge will motivate you to create based on a visual stimulus. Like a picture of a beach sunset, photo of nature scene or just looking around your home or out of your stamp room window.
So, my idea is to focus on a different challenge every week to help you, and me, grow in our stamping talents. On each challenge I will choose a random winner who will receive the creation I post as my sample, along with some simple stamping goodies. How's that sound??
Do a lot of these challenges sound familiar? They should, as many of them are featured on SCS and is where my idea came from. I have my own ideas to put a spin or a twist on each of these, but also going back into the early days of these challenges and focusing on them too. Credit will always be given where I found my ideas. SCS is a major influence on my stamping and what helped be to grow as a stamper.
I have a poll going on the right asking what day of the weekend, Saturday, Sunday or either day sounds good for you. I know a lot of the challenges already out there are during the week and I want to focus more on the weekend. Especially since I work during the week, as I know many of you do too.
So cast your vote and let me know what you think about new feature to begin!! I hope many of can join me in Getting Creative!!!
Happy Stamping everyone!!!
~~~Ann~~~
Thursday, July 10, 2008
Blog Candy & Photos
Hello everyone!
I'm so excited that so many of you are loving the Bag in a Box project and I want you to know how happy that makes me!
I have received a few emails asking me just how do you link a photo to my blog?? It's really not that difficult, yet if you don't have a blog or upload to SCS, you might find it more challenging!! Let me explain the best I can.
If you have a blog, all you need to do is post a comment here and then copy & paste your blog's web address along with your comment. I can then go back and check out your creation.
If you don't have a blog, BUT you DO upload to SCS, then you simply repeat the steps above, but this time you are copying & pasting your online gallery web address. Also, if you have an SCS gallery, please include the keyword BBB1 with your upload and everyone can find them easier!!
Clear as mud right? If you do not have either, then simply email me a pick of your creation to pinkstamper06@yahoo.com and I'll see your project that way. And you'll still be included for the blog candy!!
With all of this said I am going to extend the time for creating your bag and getting me a picture, one way or another! The new deadline is now Monday, July 14th by midnight and I will pick the winner with a random number generator on Tuesday, July 15th by 8pm!
Happy creating everyone!!
~~~Ann~~~
Wednesday, July 9, 2008
Peaceful Lillies - BWC13 & CC174

Hello everyone!! It's Wednesday again and that means another BWC from Ashley! This week it's another great sketch challenge and I combined it with CC174 Groovy Banana Chips!!! Can you guess what the colors are? Groovy Guava, Barely Banana and Chocolate Chip.
On my card today I used the Lovely Lilies set and the peace from Make a Difference. Both of these sets are available from Treehouse Stamps.
As the SU! year comes to an end, I need to start using up some of the in-color cardstock I have in excess!! So for this card I used my Groovy Guava textured and made this a 3" x 6" which will fit unto the small open-end envelopes SU! sells. You can get four cards this size from on piece of 12 x 12 cardstock.
I stamped the medallion in Groovy Guava, after stamping off once, onto the base card, laid my ribbon down and placed my main image panel. Then I stamped my sentiment on the upper right corner. That's it! A quick and simple card perfect for a sympathy card, thinking of you or just because. I will use this a sympathy card since I do not have many on hand, and when you need one you want to be able to send it right away.
Go check out Ashley's blog for the sketch and check out what the other Treehouse Girls have done!
And don't forget to check my post just below with my Bag in a Box tutorial and Blog Candy!!!
Happy Stamping!!
~~~Ann~~~
Monday, July 7, 2008
My First Tutorial - Box in a Bag!! And Blog Candy!!!

Hello everyone!! I first found this adorable idea on a blog by Paula Goff and decided to try it out. How easy and cute are these??? To put the basic elements of the project together took me no more than 30 minutes. Now trying to decide how to decorate it was another matter entirely!
So you can try these adorable bags for yourself, here is my first tutorial for all of my fellow stampers. Just to be clear, this is not my original idea, not sure who's it is, as I've seen them popping up all over lately.
At the end of this tutorial you will see what the blog candy is all about!!

Supplies you will need:
Designer/Patterned paper – cut to 5 ½” x 11”
Coordinating cardstock – cut to 4 ½” x 4 ½” and 1 ½” x 11”
Slit punch
Paper snips
Scoring blade/Scor-Pal ®
Sticky Strip
Adhesive
Bone Folder
Round Tab punch – 2 needed for handles
stamps/ribbon and other accessories to finish your bag
Designer/Patterned paper – cut to 5 ½” x 11”
Coordinating cardstock – cut to 4 ½” x 4 ½” and 1 ½” x 11”
Slit punch
Paper snips
Scoring blade/Scor-Pal ®
Sticky Strip
Adhesive
Bone Folder
Round Tab punch – 2 needed for handles
stamps/ribbon and other accessories to finish your bag
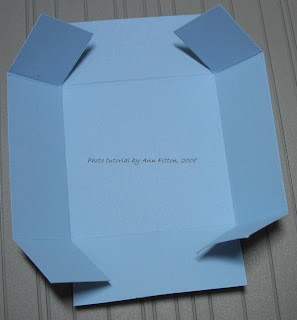
Step 1
Using a scoring blade or a Scor-Pal ®, score the 4 ½” x 4 ½” piece at 1” and 3 ¼”. Turn cardstock 90’ and score again at same positions. Fold and crease your box using bone folder. This is the base of your project.


Step 2
Using your paper snips, cut up to the 1” mark on 2 of the four sides
Step 3
On the 4 outside squares, apply 2 strips of sticky strip.
You can now begin assembling your box. Fold the squares with the sticky strip into the box.
You can now begin assembling your box. Fold the squares with the sticky strip into the box.

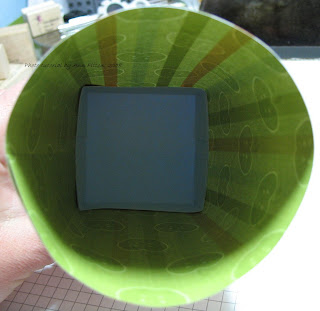
Step 4
On the side of the designer paper you want facing INSIDE your box, lay a strip of sticky strip on one long side and one short side. TIP: If you are using striped paper, as I am, be careful when you cut it so you have your stripes going in the direction you want them to. Remove the red backing from the long side only. I also ran a strip of my SNAIL ® along the top edge of the sticky strip just for added strength.

We are now going to adhere the box to the designer paper to begin forming the bag. Start in the middle of one of the sides where the squares are folded into. TIP: Be careful of lying the box down and lining up the paper and the box. Sticky Strip is very unforgiving!!

Now start “rolling” your box along the bottom edge of the paper.


Before you get to the very end, pull off the backing from the strip on the short side of the paper.
Step 5
Using the strip of cardstock, and your slit punch, punch out a scalloped edge. If you have the new SU! scallop border punch, or any border punch, this works great too!


Step 6
Once your scallop edge is punched out, lay a strip of sticky strip along the entire length. You are now ready to adhere the scallop to the bottom of your bag. This will be done pretty similar to way you wrapped the designer paper around the box. Start at the back of your bag, either at, or just over, the seam. Remember: Sticky Strip is very unforgiving if it sticks where you don’t want it!!


Step 7
Place two strips of sticky strip on the Round Tab punched pieces. DO NOT remove backing yet!!

I used my Crop-A-Dile to make holes, but a handheld punch works too.

You can leave the holes as is, or as I did, add eyelets for added strength. Tip: If you use eyelets, put the handles on the bag first and then set your eyelets. Makes it just a little easier. Put the handles in the middle of each of the “wider” sides.

This is what the finished Box in a Bag will look like, without any embellishments or ribbons or whatever you decide to use to decorate your bag with.

Here is the finished bag from the tutorial:

The apple bag I left the holes on the handles bare and on the Koala bag I added white eyelets. If you want to add two ribbons as I did here, use bigger eyelets or none. This was a tight fit! The scallop on the apple bag uses a Martha Stewart punch. The finished dimensions of the bag are 5 ½” H x 2 ½” W at the base. All images © Treehouse Stamps, 2008.
These bags are quick and easy to make for small thank you, birthday, thinking of you or hostess gift. They can be filled with chocolates, pens, gift cards, or small stamps and ink spots. Whoever you give one of these to will love it!!
If you decide to give this a try, link your bag back here to be entered into my Bag in a Box blog candy giveaway!!! I'm not exactly sure what I'll be giving, but there will be 2 winners, and each person will receive one of the bags I've already made filled with lots of stamping related goodies!!!
You will have until Saturday, July 12, 2008 by 12 midnight to link your bag back to me. I will choose a winner using a random number site on Sunday, July 13, 2008 and post the winners by 6pm. So get creating!! I can't wait to see what everyone comes with!
Happy Stamping!!
~~~Ann~~~
Saturday, July 5, 2008
Stamping Simply with Inspiration

Hello everyone!!
I hope your holiday weekend is going well and you are enjoying the time. We had another beautiful day here in Michigan and tomorrow is no different, except maybe a little warmer. Not sure how much I'll be able to stamp tomorrow as I HAVE to clean out my gutters!!! I have a forest growing on one side! Oh the joys of home ownership and being a single woman!! But I have all my supplies and I'm not afraid to do it! Until then I have 2 cards to share with you today.
My first card is for Sharon Johnson's Stamp Simply challenge she hosts every Friday on her blog, No Time to Stamp. This Friday the challenge was to "Make it Girly"#42! Well, when I think of girly I think of flowers, pinks and fancy ribbons to name a few things! Almost immediately I thought of the soon to be retired SU! set, Blossoms Abound. I haven't used it much, and I'm not sure why. I love lilacs and I love the look of the stamped images.
Part of Sharon's challenge is to stamp simply, which can be difficult for me!! I just don't seem to know when to stop! But I think I adhered pretty well to the stamp simply idea on this card. I stamped my lilacs three times, twice on the cardfront and once on a separate piece and then cut them out. I used Pretty in Pink and Purely Pomegranate ink, but I stamped off once on my Purely Pom. so it wouldn't overwhelm the Pretty in Pink.
My thought with the strip of cardstock at the top of the card is give the illusion of the lilacs hanging from a beam, so to speak. The middle lilac is up on thick foam squares, and yes I cut out the branch and leaves!!! Not sure what I was thinking, but I really do like the effect it provides. I then coated my lilac with crystal effects. Some sheer white ribbon edged in silver and piece of pink taffeta finishes it off.
I used PTI white cardstock here as I like how much sturdier it is than SU!'s white.
My second card is for today's IC135 on SCS. Steph inspired us to create based on enameled products from Macintosh Enamels. You can see the piece I was inspired by in the IC135 forum.

When I saw the plate I knew I wanted to use one of my carousel notes to provide the circular feel. Then I cut the largest circle from my Coluzzle, ran it through my Cuttlebug Stylized Flowers folder, after I sponged Wild Wasabi & River Rock ink onto the negative part of the folder. This I learned from Technique Junkies and it's called Cuttlebug Smoosh. I sponged the edges heavily with more Wild Wasabi to help achieve the darker green look from the plate.
The dragonflies were stamped in Choc. Chip, cut out and adhered with thick foam squares. More sponging around the sentiment and I layered this with Brushed Gold and Choc. Chip cardstock. A clip from the Aged Copper HPH set was used to hold the ribbons on. The sentiment panel is on using SU! dimensionals. As an added touch I used my 1/8" punch for the holes on each scallop section and mounted all of this on a 5" x 5" square card of River Rock textured.
Well, that's all I have for now! Off to make, and photo, a project for the July newsletter for Treehouse Stamps!!
Happy Stamping!!
~~~Ann~~~
Friday, July 4, 2008
Happy Fourth of July America!!!!

Hello my fellow stampers and I hope this finds everyone having a safe and enjoyable day!! Here in Jackson, MI we experiencing a gloriously beautiful day of sunshine and just right temps! That has happened here in a few years.
For LSC175 on SCS today we are incorporating the 4th literally!! Judy is the guest hostess and her challenge for us is to us only four colors; Red, White and Blue (she counted the and), no more than four layers of cardstock and only four embellishments or speciality tools.
WOW!, did I have to think on this one, but I love how this came together. I knew right away I wanted to use Bayou Blue, Ruby Red and River Rock along with my White. I love how well Bayou Blue and Ruby Red go together and River Rock fits perfectly as my fourth color.
I chose to use my American Dream set from Treehouse Stamps since it embraces the holiday so well. I stamped my kids in black staz on and colored them with my SU! markers. They were stamped on watercolor paper. Once I was done, I used my ink pad lids of Soft Sky and Cert. Celery to brush on the sky and grass with a watercolor brush. The firecrackers were stamped with Summer Sun and punched out with the 1/2" circle punch and raised up with a dimensional.
My BG white layer was ran through the CB with the Distressed Stripes folder using the Cuttlebug Smoosh technique. The scallop circle was punched in River Rock and layered with a white circle and the sentiment stamped in Ruby Red. I used Summer Sun around the edges.
The final step was running the River Rock stitched ribbon around the top and tying a knot with the River Rock & Blue Bayou stitched and white taffeta. The main image panel and sentiment circle are all up on dimensionals. Judy said they counted as adhesives!!
Happy Stamping everyone!!!
~~~Ann~~~
Wednesday, July 2, 2008
It's Wednesday!!!!

And that means it's time for the Brainwave Wednesday Challenge!!! This week Ashley challenged us with a color combo of Sage Shadow, Certainly Celery, Barely Banana and Very Vanilla. At first I thought, no problem!, until I started putting the card together!!! Sage Shadow is not a color I use very often and I'm not sure I like on here how I layered it with the Certainly Celery.
But I do like how the overall design and thought came together. You'll see the same layout on the second card, which I did for this week's CC on SCS, and I was amazed at how this layout came together. I was just pulling scraps out of my boxes and the next I knew there it was!! I love it when it comes together so easily!
My first card uses the Life is a Picnic set with the adorable summer picnic images. I cut out the grapes, after watercoloring them with my ink pad lids and blender pen, cut them out and popped them up with thick foam squares. The oval mat the any is on is up on SU! dimensionals.

My second card uses one of the newest individual stamps, called Fishy Friend. The CC on SCS is Purely Pomegranate, Certainly Celery and Wild Wasabi. I added black to break up the two greens.
I first stamped my fish on watercolor paper in black craft and then embossed her with clear EP. Using my ink pad lids and blender pen again, I watercolored her with the CC colors. I have a couple more images of the fish stamped and colored for future projects and I just love how fun she is to watercolor.
The buttons on here are a gift from secret big sis on SCS and from BasicGrey. I used them to mimic the bubbles my fish is blowing.
All stamps here are from Treehouse Stamps and can be found on their website, which you can easily get too by clicking on the Treehouse logo in the right sidebar.
I hope everyone is having an enjoyable summer so far and has many picnics and fishing stories to tell at the end!!
Happy Stamping!!!
~~~Ann~~~
Subscribe to:
Posts (Atom)