Sunday, November 30, 2008

GCA #19 - Gift giving made easy!!


Hello everyone!!! Since Christmas will be here before we know it, I thought the challenge for this week would be something with gift giving in mind. Once you make one of these nifty gift card holders you will see how quick, fun and adaptable they are to whatever the occasion might be!
I made these for convention in 2007 as my 3 D swap and even got a sample of one back from a fellow demo!I have picture of hers at the bottom. I also have a picture of one I made for a friend who will use these for her nieces & nephews this year.

Now on to the tutorial!!

Items you will need:


* Cardstock cut to 4 1/4" x 11" - scored at 4 1/2" and 1 3/4"

* One business/legal size envelope

* Cardstock cut to 3 1/4" x 4" for base of your greeting/sentiment panel

* Velcro sticky dot or other appropriate closure

* Glue dots or sticky strip

* Any type of embellishments, punches or ribbon of your choice

Step 1:

Score your cut cardstock piece at the above measurements. Crease with bone folder. If you wish to scallop the front flap tab, now would be the time, as well as, if you wish to stamp on the gift holder itself. On my sample I used the Lots of Dots jumbo wheel stamped in Summer Sun on the inside and outside of the holder.

Step 2:


Using either the double slot punch from SU! or a handheld punch, make holes/openings for your ribbon, as I did in my sample. In the other two samples, a Felt Fusion flower was used and a chipboard tag. Feel free to decorate as you wish. If you decide to punch holes for ribbon, MAKE SURE you go up far enough so you still have space to place you velcro sticky dot. I used a whole one on these, but you can even cut them in half. The small magnets would work here as well.


Step 3:

Seal your envelope and fold in half. On the outside ends, use an edge punch, deco scissors or just trim off with your paper trimmer to have the openings for the sentiment panel and the gift card. Another option is to just trim off the edges and use circle punches to create openings in the middle of the envelope edges.

Step 4:


Using glue dots or sticky strip, place a piece on the front and back of the envelope in about the middle of the envelope. You don't want the glue dot too high or it makes it harder for the holder to open easily. Center your envelope in the middle inside panel, JUST ABOVE the fold up flap score line. If you put your envelope right on the score line, it will be bulky and difficult to fold. I do not recommend using SNAIL or mono on here as there is too much movement with this and it will not hold. Now add a glue dot to the middle of the folded envelope to keep them together.

That is the basic work of the gift card holder. Read on for embellishing it!

Step 5:

Using the piece of cardstock of 3 1/4" x 4" as your base, layer and decorate as you like. Remember if you add a tab to the top, do not put it up too high or the top flap will not close! On my sample here I used the Sweet Shapes set and just added a round tab punch at the top. This would be perfect for a birthday gift card holder. This piece goes in one of the envelope pouches and your gift card goes in the other.

Step 6:

Embellish the front/outside as you like. On my sample here I used the stamps from Sweet Shapes and did a collage effect. For some added bling I put rhinestone/pearl stickers on the flower centers.


That's it! How easy is that to make?


To be entered in the challenge drawing, make a card using the different dimensions, and limitations, for your card , upload it either to your blog, or to an online gallery and post a link to your card to this blog entry as a comment by December 5, 2008 at 12 midnight. I will choose the winner through a random number generator and post the next day.

Even if you can't make the drawing deadline, PLEASE feel free to participate in the challenge and upload your creations at any time. I would love to see it!If you upload your card on SCS, or Paper Craft Planet, please put GCA19(NO SPACE IN BETWEEN GCA AND 19) in the keyword section. That way everyone can look at all of the creations at once! If you've been waiting to join in the fun, jump on in and have some fun!!


Happy Stamping!!!

~~~Ann~~~

Saturday, November 29, 2008

GCA #18 Winner is....

....actually there are two!!! Since Thanksgiving was just this past Thursday, I am yet counting my blessings in this world. And I am very thankful for Brandy and Cathy, who have played along with my Getting Creative with Ann challenge since the beginning!

And not only do I have two wonderful stampers playing along, but I also have two friends!! Stampin' goodies on the way to both of you wonderful ladies!!

You can see Cathy's card here, and Brandy's here. Make sure to check them out! Simple cards are always a challenge for, as I love to lay on the layers and embellies!! Both of these ladies did a fabulous job!!

Happy Stamping!!

~~~Ann~~~

Sunday, November 23, 2008

GCA #18 - A Simple Sketch!


Hello everyone!! This week we are focusing on an easy and simple sketch to create fantastic cards!! The sketch, and idea with the stamp set, came from a swap I received at convention this year, but I don't know who it came from!! : (

Not only is this a sketch challenge this week, but you can only use the number of layers and embellishments I have here in my sample!! So that is 2 layers, in addition to your base card and you can use one additional piece for your sentiment.

I used the ticket corner punch on each of the inner panels, but you can use another corner punch or none, if you wish. I am working on another sample I hope to have up shortly to show you a different variation you can try!!

The inner panel pieces are cut smaller to leave more of a "frame" around them with the base card. The Whisper White panel is 4 3/4" x 3 3/4". The Basic Black panel is 4 1/2" x 3 1/2". My base card, Baja Breeze, is the standard A2 size. If you wish to make a square card, just alter your dimensions enough so you have a frame of your base card.

My sentiment on here was punched out using the Key Tab punch, but again you can cut your sentiment or punch it out, whatever works for the sentiment you choose. On here my sentiment is up on dimensionals to go over the ribbon.

The only embellishment allowed is ribbon!! Any kind, size or amount you want, but only ribbon may be added as your embellie!!! If you want to emboss, as I did, go right ahead or even doodle around the edges. Our goal this week is to keep it simple!!

To be entered in the challenge drawing, make a card using the different dimensions, and limitations, for your card , upload it either to your blog, or to an online gallery and post a link to your card to this blog entry as a comment by November 28, 2008 at 12 midnight. I will choose the winner through a random number generator and post the next day.

Even if you can't make the drawing deadline, PLEASE feel free to participate in the challenge and upload your creations at any time. I would love to see it!If you upload your card on SCS, or Paper Craft Planet, please put GCA18 (NO SPACE IN BETWEEN GCA AND 18) in the keyword section. That way everyone can look at all of the creations at once! If you've been waiting to join in the fun, jump on in and have some fun!!

Happy Stamping!!


~~~Ann~~~

Saturday, November 22, 2008

GCA #17 Winner is....

.....KIM!!! Check out her fabulous card at her blog, Endless Inkabilities! I love the punch she used on here to create her Christmas tree and I am going to try that out this weekend!! Thanks so much for playing along Kim!! Please send me your address to: pinkstamper06@yahoo.com so I can send you some stamping goodies!!

Thank you Brandy and Cathy for playing along again this week!!!

Just a hint about GCA#18 - we're getting sketchy!!

Happy Stamping!!!

Ann

Sunday, November 16, 2008

GCA #17 - Let's get Punchy!!!


Hello everyone!!! Do you ever look at your punches and think, "What can I make with this other than a circle, square or rectangle?" Honestly, I can say I don't! When I look at my punches I see what they are!!! I know what a dweeb I am, but thank heavens for those out there who can see past the circle, square or rectangle!!!

The challenge for this week is to use your ANY of your punches to create something with them other than just a circle, square or rectangle. Again, use any punch you have!! This is not limited to only those I have mentioned!!

My first sample is actually an idea I cam up with last year, after seeing all the wonderful ideas being posted by memory_lane on SCS. You can check out the Punched Art gallery here for ideas.

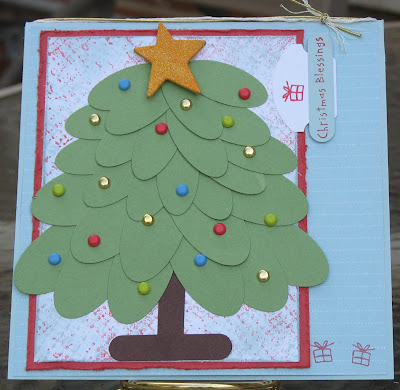
On my sample I used both the small & large oval and word window punches to make my Christmas tree. As I was punching the ovals out this tree kind of took on a life of it's own and turned out bigger than I anticipated, but I really like how it turned out! All I did was add some brads for my ornaments and a small chipboard star for the top!


My second sample is using SU!'s scalloped circle punch to make turkey feathers!!!! How cute is that!!!! This card came from my secret "Goofy Gobbler" on SCS with the Michigan group I belong to. I just love this turkey!!

To be entered in the challenge drawing, make a card using the different dimensions for your cards , upload it either to your blog, or to an online gallery and post a link to your card to this blog entry as a comment by November 21, 2008 at 12 midnight. I will choose the winner through a random number generator and post the next day.

Even if you can't make the drawing deadline, PLEASE feel free to participate in the challenge and upload your creations at any time. I would love to see it!If you upload your card on SCS, or Paper Craft Planet, please put GCA17 (NO SPACE IN BETWEEN GCA AND 17) in the keyword section. That way everyone can look at all of the creations at once! If you've been waiting to join in the fun, jump on in and have some fun!!


Happy Stamping and Punching!!


~~~Ann~~~

GCA #16 Winner is......

.......Brandy!!!! You can see her entry for this challenge on her blog, Brandy's Stamp & Share. Thank you again Brandy for playing along again this week!!!

And thank you to everyone who has stopped by blog to check out my challenge and leave comments!! I've noticed a huge jump in my counter over the past week!!! I hope many of you can join in and play along!!

Coming up next is GCA#17!! Grab your punches, because you'll need them!!

Happy Stamping!!

~~~Ann~~~

Wednesday, November 12, 2008

Christmas Cards everywhere!!!

Hello everyone!! I have two cards to share with you today! I find it much easier, and less frustrating, to make my Christmas cards at various times so I can make them each individual. Sometimes this plan works and other times it doesn't!!! : )

My first sample is for SC202 on SCS this week. Fantastic layout and so many possibilities! I used the Scandinavian Season set and matching wheel which is currently available in the Holiday mini. I also included CC192 with this card which is to use Pacific Point, Basic Grey and Certainly Celery. I love to use non-traditional colors on my Christmas cards and this color combo certainly qualifies!! I also use Shimmery White on here, white is just fabulous to use with Christmas/elegant cards.

I stamped the tree in Certainly Celery and then used my Choc. Chip marker to go over the tree trunk. I then stamped the tree again in Pacific Point and just cut out the flower, which popped up on a dimensional

To add some bling, I added a crystal rhinestone to the flower center and mini green rhinestones to the corner of the sentiment panel. I had a hard time trying to figure out where to place that panel as I didn't want to cover up my tree!!

To make the snowflakes two toned, I did the Rock n Roll technique on them. I like this effect.
My second sample is one I made for FS85 on SCS!! I know I am posting this late, better late than never right? This is also for CC185 on SCS and for CCNov1008 on Paper Craft Planet!!

What is Paper Craft Planet (PCP) you ask?? Well, just follow this link here and you can discover this wonderfullt amazing new stamping community too!!!! Check it out and let me know what you think!!


My second sample uses the set Wise Men Seek Him by Treehouse Stamps. I love this set as it conveys the meaning of Christmas so well for me!

I colored in the 3 wise men with my SU! markers and highlighted the star and candle with the Bashful Blue marker. One the Very Vanilla panel I used the snowflakes folder from last year in my CB and shaded with Baja Breeze.


Happy Stamping!!


~~~Ann~~~

Sunday, November 9, 2008

GCA#16 - Playing with Chipboard!!

Hello everyone! Lately I have been pulling out my sorely unused and neglected chipboard and playing with it! There are so many ways to use chipboard and give your cards and projects a definitely different look.

For example, you can:

* Emboss on chipboard, either with dye ink and Versamark or craft ink

* Cover it with patterned paper

* Use it as your focal point on your card or as an enhancement

* Trim it to fit with your card. Don't be afraid to snip off a few pieces.

* Layer your chipboard pieces, especially those that come together

* Mix and match different types/styles/fonts for an eclectic look

* Leave it plain and distress with your ink pad!

Don't have any chipboard? (I can't believe that, but here's your chance to go out and get some!!) If you don't have any chipboard at all, you use any lightweight cardboard and trace an image onto it and cut it out. Lightweight cardboard can be from an empty cereal box, or box of that type, the cardboard layer that comes in the SU! designer series packs, or even the backing of any notepad holder!

Want to spell out a word, but you've used up all of that letter? Trace the negative space onto a piece of chipboard, or substitute, and go from there!

All of my samples have chipboard that is embossed or covered in dsp. My first sample uses the barn from Happy Fall Y'all, and the other stamps are from the Jolly Snowman set all by Treehouse Stamps. I used the large snowflake from SU!'s Christmas chipboard from 2007, but I needed to trim the edges because the snowflake was too big. I stamped it in Sage Shadow craft ink and clear embossed and then covered it with a crackle finish. The crackle doesn't show up too well in the photo. I also outlined the barn and fence with my glitter pen. This card also uses SC199.

My second sample shows the original size of the snowflake from the first sample, plus I paired it with the negative image from punching out the snowflake. I stamped Not Quite Navy craft ink on the negative image piece and clear embossed over. The snowflake was stamped in white craft ink and embossed with white ep.


The third sample is a flower from SU! of last year. (See, I told you I've been neglecting this stuff!!) My idea for this came from the cuttlebugged BG panel and from FS91 - Beccastamps. She has a lot of beautiful cards in her gallery showing off the CB images. The folder I used here is the leaves and I wanted the look of the leaves coming up and out from the flower. I then tied the chocolate satin ribbon around the flower for a tag effect.

The flower was first stamped in Baja Breeze dye ink, swiped lightly with white craft ink and then covered with Versamark and clear ep. The center of the flower was covered with a piece of Ski Slope dsp, but you can't see much of that now! Lots of dimensionals were used on this card!!

I hope my samples give you a good starting point to pull out your chipboard, or create your own, and give a new look to your cards!

To be entered in the challenge drawing, make a card using the different dimensions for your cards , upload it either to your blog, or to an online gallery and post a link to your card to this blog entry as a comment by November 14, 2008 at 12 midnight. I will choose the winner through a random number generator and post the next day.

Even if you can't make the drawing deadline, PLEASE feel free to participate in the challenge and upload your creations at any time. I would love to see it!If you upload your card on SCS, please put GCA16 (NO SPACE IN BETWEEN GCA AND 16) in the keyword section. That way everyone can look at all of the creations at once! If you've been waiting to join in the fun, jump on in and have some fun!!


Happy Stamping!!!


~~~Ann~~~

Saturday, November 8, 2008

GCA#15 Winner is....


....Cathy! Cathy thank you so much for playing along again this week!! You can see her fabulous card here.

I apologize to everyone for not getting my sample up earlier, but we have had some crazy weather here in Michigan and it has left me with a horrible migraine all week!! I'm hoping now that the weather has turned cooler it will take the migraine with it! Sometimes I can work through these, and my stuff I did work on this week was in stages, other times I just have to be in bed with the lights and noise off and the covers over my head!

Here is my finished sample for this past weeks GCA. I used one of the Top Note pieces I did when I spent the day at my friends house playing with her Big Shot. I LOVE this die! And you can use the Top Note die in the Cuttlebug, but only with cardstock. Nothing thicker or it will crack your plates!! Trust me!

The piece here was run through the Big Shot using 1/8" chipboard pieces. At first I was going to leave the chipboard plain, but after laying out my pieces I decided to shade the edges with my Choc. Chip ink pad. I like how this mimics the headboard in the inspiration piece.

My base card is Sage Shadow which I lightly stamped in Sage Shadow with the Twill BG stamp. I used the same stamp on the main image panel, only in Sahara Sand using my fingers to lightly apply the ink. To me this mimics the bedskirt on the bed.

My stamp set I used was Eastern Blooms. I love the simplicity of this flowering branch and how you can make it the different colors to match your image or one solid color for monochromatic look. On here I used my Choc. Chip, Ruby Red, and Sage Shadow markers.

And don't you just love how the Curly Label punch goes with the Top Note die? Those people at Stampin' Up! sure do know how to reel us in!!!! : - )

I have a short tutorial I am working on for a cute card portfolio that is perfect for making and giving as Christmas, or whatever, type of gifts.

Happy Stamping!!


~~~Ann~~~

Sunday, November 2, 2008

GCA #15 - Ottoman Empire Inspiration!


Hello everyone! This week for the GCA, we are focusing on this sumptuous bedding collection called, Ottoman Empire, from Soft Surroundings. The muted colors in this bedding just pulled me in and made me want to crawl right into that bed!! But before you start your creation, look at the entire picture and not just the bedding itself. See the chocolate headboard, the white orchids and sunlight coming into the room?

Take your inspiration from the colors, scroll work on the headboard or the patterns in the bedding, but use this picture to create your own masterpiece!

I'm finishing up my sample, but I have my grandson right now and he does not make stamping easy!!! : ) I'll upload it this afternoon.

To be entered in the challenge drawing, make a card using the different dimensions for your cards , upload it either to your blog, or to an online gallery and post a link to your card to this blog entry as a comment by November 7, 2008 at 12 midnight. I will choose the winner through a random number generator and post the next day.

Even if you can't make the drawing deadline, PLEASE feel free to participate in the challenge and upload your creations at any time. I would love to see it!If you upload your card on SCS, please put GCA15 (NO SPACE IN BETWEEN GCA AND 15) in the keyword section. That way everyone can look at all of the creations at once! If you've been waiting to join in the fun, jump on in and have some fun!!

I'm excited to see what you come with!!

Happy Stamping!!!

~~~Ann~~~

Saturday, November 1, 2008

GCA14 - Winner is...

....Jill!!! Her altered items were 2 tumbled tile coasters from when she first started stamping!!! How cool is that? This is a great way to showcase the versatility of stamps and show how the images hold up under wear & tear. You can see here coasters on her blog, Jill's Stamping Corner, and see how awesome they look!! Thanks for playing Jill! Please send me your address to: pinkstamper06@yahoo.com.

And you can see the other entries here. Thank you to everyone who played along this week!!!

Get ready for some awesome inspiration for GCA#15!!

Happy Stamping!!

~~~Ann~~~