Showing posts with label 3-D projects. Show all posts

Tuesday, September 1, 2015

Up cycled chunky picture frame!!!

Made this awhile ago and realized I haven't shared it!!
I bought the frame a LOOOONG time ago, intending on doing something with it! It originally was pink with brown crowns all over it. I painted it a soft ivory with paint I used in my living room paint job. It's a nice chunky wood frame. Once it was painted, I covered the front in a piece of off white burlap, adhered with spray adhesive.
The flowers were made with the now retired Amore fabric from SU!. The three small flowers are rolled and topped with a gold metal button. The larger flower was made using the 3 inch circle die and then folded over and hot glued to a piece of felt. The leaves are made from the Mossy Meadow satin ribbon. The ruffled burlap ribbon came from Hobby Lobby.
I love how it came out and how it really makes the photo pop! That is a picture of my husband and I on our wedding day, riding off after we were officially married!!


Thanks for looking and Happy Stamping!!!

Ann

Saturday, July 6, 2013

Mardi Gras Mask - 3D Project #2 for Artisan Award Entry


Hello all!!!  Here is my second 3D project that I submitted for the Artisan Award Design Team contest.  It's a mardi gras mask.  I've had this idea in my head for the longest time, then SU! made one in October 2011 (I think!) and I TRIED to make one last year, but it didn't work.  Soooo, this year I rethunk my plan and this is what I came up with!

First, I found a bigger mask to work with than I did the first time.  And then, instead of trying to cover it with designer series paper (dsp), I covered it with our now retired More Amore fabric.  I was so happy that I got the words on here straight the first time!!!  I adhered it with Mod Podge.

I colored rhinestones with a black sharpie and outlined the eyes with them.  The Vanilla Flower trim (now retired) was colored with Real Red ink.  The paper doilies above the eyes were colored with Basic Black ink and just cut in half and glued onto the back.

To give the mask a little more height,  I cut some dsp from the neutrals stack and the rosette die.  I then adhered a large rhinestone at each of the scallops.

The rest is pretty much embellishments to help make it "look pretty"!

Thanks for looking!!

Stamped Blessing!!

Ann :)

Friday, July 5, 2013

Burlap Topiary - Artisan Award 3D project


Hello all!!!  I really must get back in the hang of posting on my blog!  I have so many creations to share, but it seems like life just gets in the way!

What I have to share with you today is a burlap topiary.  I made this project as one of the 3d items for the Artisan Award Design Team contest through Stampin' UP!  Unfortunately, I was not chosen as a finalist, but now I do get to show off my projects that I submitted!!

This is a double ball topiary, pre-made, that I cut flowers from the Fun Flowers die out of burlap.  I used four different shades of burlap, 2 dark shades and 2 vanilla shades.  The center of the flowers have smaller burlap flowers in contrasting colors and then centers cut from our now retired fabric.  All of the flowers were attached with straight pins and then covered with the flower centers so you can't see the pins.  I have NO idea how many flowers I cut, but I DO know that I had burlap dust everywhere!!!  And was sneezing my head off!!

The jar was painted with plain white craft acrylic paint that was tinted with Pool Party re-inker.  There is two coats inside to give it a nice thick coat.  I kept the embellishments outside simple, since I wanted the focus to be on the topiary.

Of all the projects I did, this one was my favorite.  And took me the longest to complete too!!  Probably about 3 full days if I added it all up, but it was worth it in the end, even if I didn't win.  I just hope to see it on display at convention.

Thanks for looking!!!'

Stamped Blessings!!

Ann :)

Monday, March 7, 2011

GCA # 127 - Let's Hear it for Green!!!


Hello all!!!  I'm sure you all so this coming didn't you??  Well, I just couldn't help it!  LOL!!

This week's challenge is to focus on the Green's in our card stock stash, in honor of St. Patrick's Day coming up.  Your creation does not have to be related to St. Patty's Day, but it just needs to have lots of green!!!  Use your card stock, embellishments or inks to bring it on!

This never-ending migraine is FINALLY gone!!!!!  I HATE those things!!!  Thank you to all who sent me well wishes!!

Finally I got the Petal Cone die from the Occasions mini and, of course, had to play with it right away!!!  I wasn't really sure what I was going for at first, except that I knew I wanted to put a "window" in one of the sides. 


The base of the cone is Pear Pizzazz and then I covered it with the Springtime Vintage dsp.  Of course, the green side!!  And to throw a little more color, I used the flowery side with Rich Razzleberry.  The handle, which you can't see all of, is using Pear Pizzazz twill.


And just because I am soooooo anal about things, I covered the inside with Very Vanilla!!  It just didn't look right with the window.  The button is one of the Sweet Stitches fabric buttons.  Once I finished this I wasn't sure what to do with it.  I was looking at the banner strips left over and decided to try greeting on them!  The ones I used are from the Bring on the Cake set from the Occasions mini.

Upload your creation to either your blog or to an online gallery and post a link to your creation to this blog entry by March 12, 2011 at 12 midnight. I will choose the winner the next day. If you upload your card to SCS, PaperCraft Planet, Stampin' Addicts, Stampin' Connection (for SU! demos) or Stamp TV, please put GCA127 in your keywords. That way everyone can see all of the wonderful creations at once!

Even if you can't make the drawing deadline, PLEASE feel free to participate in the challenges and upload your creations at any time. I would love to see it! And yes, my challenge is open to everyone who visits, even if you live outside the US!


Happy Stamping!!!!

~~~Ann~~~~ 

Saturday, February 19, 2011

My Tall Treat Box on Craft Project Central!!!


Hello all!!!  My project as a February guest designer for Craft Project Central, is now posted!!!  And, it's the February Bonus project!!!  Hop on over there and subscribe and refer your friends!  All of the projects on this site are SUO and fabulous!!!!

This tall treat box can be used to give many different types of gifts to your friends and family! With the clear window front it will give the recipient a sneak peek of what’s inside! Change up the theme and use it to give gifts for any holiday! Makes a great club or class project!
To get the instructions for this great project, just subscribe to two or more months in a row, put our badge on your blog, or refer a friend and when they subscribe, let us know!

Happy Stamping!!!

~~~Ann~~~

Saturday, February 12, 2011

More Awesome Projects Posted at Craft Project Central!!!


Here's a cute little accordion card box to store your cards in.  Make several and give them away as gifts!  This project makes a great class or club project as well! 
To get the instructions for this great project designed by Sonya, just head on over to Craft Project Central and subscribe to February!


Here is a handy little Petal Cone scissor pouch for your stamping room.  Keep your Paper Snips inside, and (hopefully) you'll never lose them!  Makes a fabulous gift for a quilter, hostess, or any crafter! 

To get the instructions for this pretty project designed by Sharon, just head on over to Craft Project Central and subscribe to February 2011!


This yummy dessert recipe is the perfect end to a romantic Valentine's dinner. Oh what the heck, the kids will love it too! Make it for everyone! Add this "lovely" recipe to your Craft Project Central recipe collection! I know several of you made all the recipe pages from last year and made books to give away as Christmas gifts!


To get the recipe (designed by Shelbywww.craftprojectcentral.com and subscribe to February!


Here's a cute little gift card holder to make and give to that someone special! Change up the theme and you can use the template year-round!


To get the instructions for this cute little gift card holder designed by Naoko, just head on over to Craft Project Central, and subscribe to February!


Happy Stamping!!!!

~~~Ann~~~

Tuesday, July 27, 2010

Artistic Etchings 3-D project for UDI


Hello all!!  While I LOVED being in Salt Lake City at convention, it is always nice to come home!  My cats missed me and haven't let up about me being gone for a week yet!

Anyway, I wanted to show the 3D project I made for the Utah Divas International (UDI) group I belong to.  We had dinner, a card swap and 3D swap at convention on Friday night.  It was a lot of fun and good food, too!  We had dinner at Biaggi's, an Italian restaurant.

Now, not to pat myself on the back, but this shadowbox really is not as hard to make as it looks.  I am absolutely thrilled with how this came out.  The most expensive item on here is the shadowbox itself!!!  And that I found on clearance at my LSS!  The rest is done with scraps and bits of card stock, which cost next to nothing.  (I'm not sure exactly how much, but you get the point!)  And it didn't take forever to make.  I literally completed this on the Saturday before I left for convention.  Now I did have the idea thought out in my head, but we all know how those ideas sometimes come out.  What took the longest was painting the box, which is painted with buttermilk craft paint.  The frame was stamped with the medallion in black staz-on, the decorative accent in Cherry Cobbler and then I spritzed Crumb Cake over it.


The inside is layered with black textured card stock, Very Vanilla and Cherry Cobbler.  My thought for this was a collage look, so I used as many different, yet similar, items as I could.  The Very Vanilla squares were put through the Big Shot with the new Vintage Wallpaper eb folder, which I inked up with Crumb Cake first and punched with the 1 1/4" square punch and layered on black textured c.s. 

The Eiffel Tower was stamped in black staz-on, versa mark and then clear embossed.  At the top, middle and bottom levels chunky crystal glitter was adhered with crystal effects.  The crown also has a row of the same chunky glitter.  The butterflies are from the Beautiful Wings embosslit in Wild Wasabi.  These were scraps from my swap card and had been stamped with the Very Vintage jumbo wheel.  The black 1/8" taffeta is the body.  I used half pearls and 2 of the clear crystals from the now retired Pretties Kit.  The crystals are a little difficult to see, but I placed a black brad through the top.  The buttons are Real Red from the now retired Playground set.

All of the squares, and many of the items on top of them, are up on dimensionals.  I used the thick window sheets for the "glass" so it wouldn't break in my suitcase.  The flowers on the "glass" are one of the decor elements items, just cut in half.

Don't be afraid to let your imagination take you on a new adventure!  I see many more of these in my future!

Happy Stamping!!!

~~~Ann~~~

Monday, May 10, 2010

GCA #88 - Sweet Memories!!

Hello everyone!!  I hope the mothers out in the crafting world had a wonderful day yesterday.  I did!  That's why I didn't make it back here to post yesterday!!

With the beginning of May, many special days come at us and many special occasions.  All of those days give us SWEET MEMORIES!  I came about this week's challenge as I was working on my gift for my mother.  Her birthday and Mother's day are just a few days apart and I so I usually combine her gifts with one large one. 

Here is my sample for this week.  Not too happy with how the pic came out, but I tried to fix it with the "fix-it" program!!  As I said earlier, this is for my mother as a combo Mother's Day and birthday gift.

I decided to create a shadow box, with the emphasis on the picture.  This is a picture of me when I was 15 months old and the last picture of me before my accident.  If you look at my profile picture closely, you can where I had some burns to my mouth area.  I took the original picture, which is very tattered and torn, and had it copied at Meijer's.  This picture started out as 8x10, but I cut it down to 5x7.

The shadow box came from Hobby Lobby and is 8x10.  I covered the back panel with a piece of dsp from the Sweet Pea stack, spritzed it with the Soft Suede and Old Olive marker and then used the direct-to-paper technique with the Soft Suede.  My intent was to go vintage.  The actual picture is matted with a piece of Soft Suede textured and then I used the distressor tool around the edges.

I used a leftover piece of "ruffled twill" I had from another project on the bottom.  The flower is made using the Flower Folds die in Cameo Coral and was distressed with Soft Suede ink.  If you look closely you can see the flower on my dress and I was attempting to bring that out.  Some of the buttons are non - SU!, but are "vintage" looking.  The flower buttons are from the Button Latte and I used a flower brad on the other button.  I used a Vanilla HPH designer label bracket for the nameplate.  A couple of nature "twigs" and it was done!

So for this week I want you to create something that either evokes the memories of past happy events, as in my sample, or something you need to create for an upcoming special day.  With graduations, Father's Day, weddings, birthdays and so many more the list is endless.
 
You DO NOT need to create a 3-D project like I did.  You can create a scrapbook page, a special card or anything your heart leads you to!  Just make it so the memories will be sweet when the recipient looks at it.

Upload your creation to either your blog or to an online gallery and post a link to your creation to this blog entry by May 15, 2010 at 12 midnight. I will choose the winner the next day. If you upload your card to SCS, PaperCraft Planet, Stampin' Addicts or Stamp TV, please put GCA88 in your keywords. That way everyone can see all of the wonderful creations at once!


Even if you can't make the drawing deadline, PLEASE feel free to participate in the challenges and upload your creations at any time. I would love to see it! And yes, my challenge is open to everyone who visits, even if you live outside the US!

Happy Stamping!!!

~~~Ann~~~

Sunday, December 6, 2009

GCA #69 - Gift Giving Time!


Hello all!!! We are certainly in that time of year where the thought of giving gifts is utmost on our minds. And while many of us love to give to give gifts, we also love to be as "frugal" as we can be!

The challenge this week is to create a gift worthy of giving to either a friend, neighbor, teacher, co-worker or even the postal carrier!!! Look around your house and see what types of containers you have left from cookies, chips or coffee drinks and let your creative side take over!

My sample for you this week is an altered cookie tin with a stamped candle inside. I used the Christmas Cocoa dsp currently in the Holiday mini to decorate the outside of the tin. And since the lid already had a red trim, I went that and left it plain. The top of the lid was covered with dsp cut out with the clear circle die and then I sanded the edges to take off the tiny bit that hung over. As I was sanding I noticed I was also distressing the red trim and just took off from there! The top layer was cut from the scallop circle die and I centered it with the snowflake flocked portion of the dsp.

I used my Mover & Shapers die for the ornament tag back layer and the ornament punch for the top layer. I do so love my Big Shot!!!


For the candle inside I used my Beary Christmas set and I also stamped the tissue paper in Real Red and Soft Suede with the snowflake to help jazz it up some.

I can't wait to see what gifts you come up with week!!

Upload your creation to either your blog or to an online gallery and post a link to your creation to this blog entry by December 12, 2009 at 12 midnight. I will choose the winner the next day. If you upload your card to SCS, PaperCraft Planet, Stampin' Addicts or Stamp TV, please put GCA69 in your keywords. That way everyone can see all of the wonderful creations at once!

Even if you can't make the drawing deadline, PLEASE feel free to participate in the challenges and upload your creations at any time. I would love to see it! And yes, my challenge is open to everyone who visits, even if you live outside the US!

Happy Stamping!!!!

~~~Ann~~~

Saturday, July 18, 2009

Artisan Award 2008 3 - D project


Hello everyone!!! Well, I showed you the three scrapbook pages I completed for last years Artisan Award, and now I want to show you the 3-D projects.

My first project is using a $2.99 12" grapevine wreath I found at Hobby Lobby. From there I took my inspiration from many things to put together this wreath.

I started by wrapping the So Saffron wide ribbon around it and then played with the ends to get them to "dangle" the way I wanted! The bow was made just by looping the ribbon around and then I tied it together with green floral wire. I used the Old Olive striped and wide gg. The piece of Very Vanilla taffeta is just looped through the bow. I then used parts from the Pretties Kit and threaded them onto the ribbon. I like how the crystals and pearls adds a touch of elegance to the wreath.

To make my many flowers I used multiple items. Some are the silk flowers from the Pretties Kit, others came from the Die Cut blooms and some of the smaller ones came from the Flower Fusion kit. To enhance some of the flowers I either paper pierced around the edges, shaded them with ink or used pearls and crystal rhinestones for the centers.

My leaves are an artificial leaf branch I cut down and inserted where I thought it looked best. I then added some artificial moss to fill in the gaps.

I haven't made another one since, but I would like too! For probably around $5-6, you can have a springtime wreath too!!

Happy Stamping!!!

~~~Ann~~~

Monday, July 7, 2008

My First Tutorial - Box in a Bag!! And Blog Candy!!!


Hello everyone!! I first found this adorable idea on a blog by Paula Goff and decided to try it out. How easy and cute are these??? To put the basic elements of the project together took me no more than 30 minutes. Now trying to decide how to decorate it was another matter entirely!

So you can try these adorable bags for yourself, here is my first tutorial for all of my fellow stampers. Just to be clear, this is not my original idea, not sure who's it is, as I've seen them popping up all over lately.
At the end of this tutorial you will see what the blog candy is all about!!


Supplies you will need:
Designer/Patterned paper – cut to 5 ½” x 11”
Coordinating cardstock – cut to 4 ½” x 4 ½” and 1 ½” x 11”
Slit punch
Paper snips
Scoring blade/Scor-Pal ®
Sticky Strip
Adhesive
Bone Folder
Round Tab punch – 2 needed for handles
stamps/ribbon and other accessories to finish your bag

Step 1

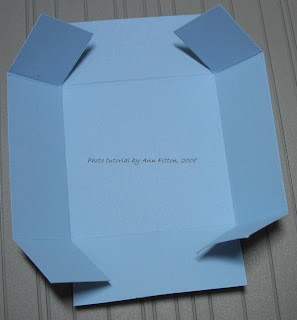
Using a scoring blade or a Scor-Pal ®, score the 4 ½” x 4 ½” piece at 1” and 3 ¼”. Turn cardstock 90’ and score again at same positions. Fold and crease your box using bone folder. This is the base of your project.


Step 2

Using your paper snips, cut up to the 1” mark on 2 of the four sides


Step 3
On the 4 outside squares, apply 2 strips of sticky strip.
You can now begin assembling your box. Fold the squares with the sticky strip into the box.


Step 4

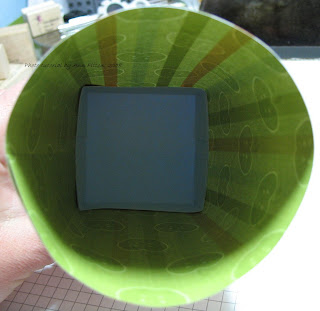
On the side of the designer paper you want facing INSIDE your box, lay a strip of sticky strip on one long side and one short side. TIP: If you are using striped paper, as I am, be careful when you cut it so you have your stripes going in the direction you want them to. Remove the red backing from the long side only. I also ran a strip of my SNAIL ® along the top edge of the sticky strip just for added strength.


We are now going to adhere the box to the designer paper to begin forming the bag. Start in the middle of one of the sides where the squares are folded into. TIP: Be careful of lying the box down and lining up the paper and the box. Sticky Strip is very unforgiving!!


Now start “rolling” your box along the bottom edge of the paper.


Before you get to the very end, pull off the backing from the strip on the short side of the paper.


Step 5

Using the strip of cardstock, and your slit punch, punch out a scalloped edge. If you have the new SU! scallop border punch, or any border punch, this works great too!


Step 6

Once your scallop edge is punched out, lay a strip of sticky strip along the entire length. You are now ready to adhere the scallop to the bottom of your bag. This will be done pretty similar to way you wrapped the designer paper around the box. Start at the back of your bag, either at, or just over, the seam. Remember: Sticky Strip is very unforgiving if it sticks where you don’t want it!!


Step 7

Place two strips of sticky strip on the Round Tab punched pieces. DO NOT remove backing yet!!


I used my Crop-A-Dile to make holes, but a handheld punch works too.


You can leave the holes as is, or as I did, add eyelets for added strength. Tip: If you use eyelets, put the handles on the bag first and then set your eyelets. Makes it just a little easier. Put the handles in the middle of each of the “wider” sides.


This is what the finished Box in a Bag will look like, without any embellishments or ribbons or whatever you decide to use to decorate your bag with.


Here is the finished bag from the tutorial:


The apple bag I left the holes on the handles bare and on the Koala bag I added white eyelets. If you want to add two ribbons as I did here, use bigger eyelets or none. This was a tight fit! The scallop on the apple bag uses a Martha Stewart punch. The finished dimensions of the bag are 5 ½” H x 2 ½” W at the base. All images © Treehouse Stamps, 2008.

These bags are quick and easy to make for small thank you, birthday, thinking of you or hostess gift. They can be filled with chocolates, pens, gift cards, or small stamps and ink spots. Whoever you give one of these to will love it!!

If you decide to give this a try, link your bag back here to be entered into my Bag in a Box blog candy giveaway!!! I'm not exactly sure what I'll be giving, but there will be 2 winners, and each person will receive one of the bags I've already made filled with lots of stamping related goodies!!!
You will have until Saturday, July 12, 2008 by 12 midnight to link your bag back to me. I will choose a winner using a random number site on Sunday, July 13, 2008 and post the winners by 6pm. So get creating!! I can't wait to see what everyone comes with!


Happy Stamping!!

~~~Ann~~~